Administration
All administrations tool are gather into one page, which is linked the main navigation bar.

Admin Area
The Admin-Tools are only visible if you login in as an adminstrator.
Admin-Tools
The Admin-Tools are either reachable by the menu bar below the main navigatio or by using the buttons as shown in the figure.
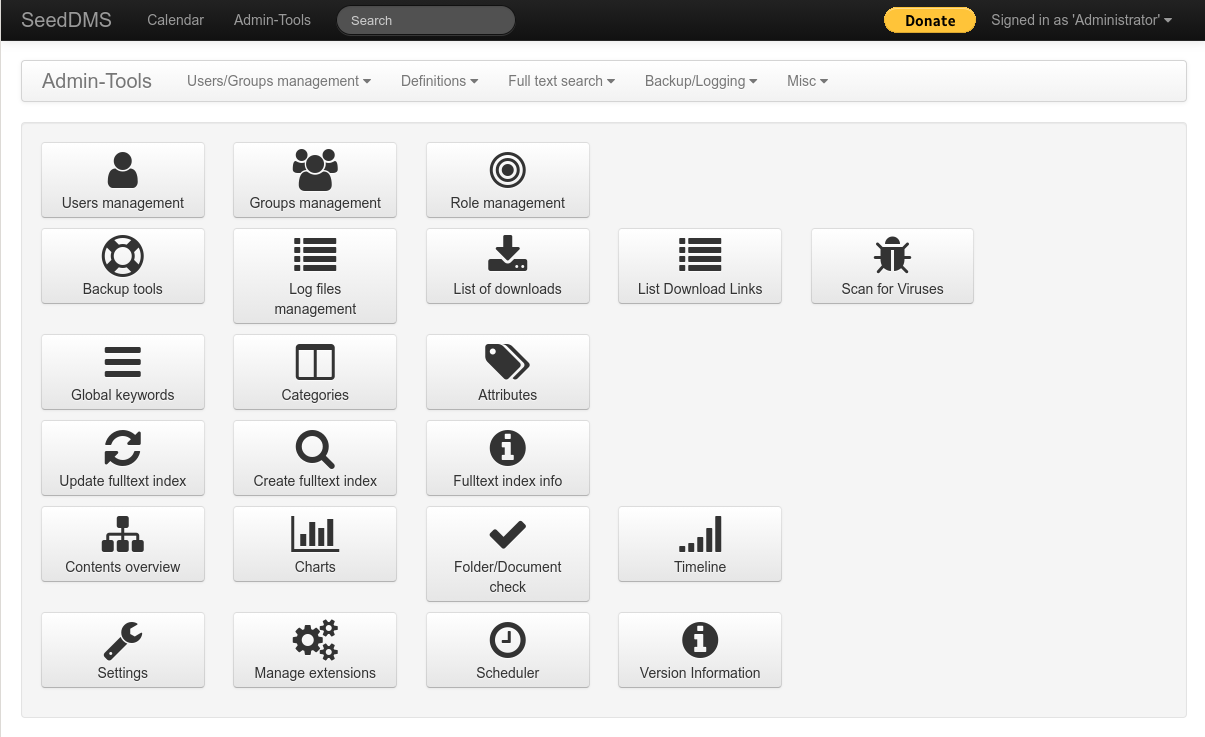
Admin-Tools Overview
- Users management
Create, update and delete users.
- Groups management
Create, update and delete user groups.
- Role management
Create, update and delete roles (requires SeedDMS 6)
- Backup tools
Create, manage, export and delete backups.
- Log files management
View and delete the log files.
- Global keywords
Create, update and delete global keywords, which can be used by all users.
- Categories
Create, update and delete document categories. Categories created here are available throughout the whole DMS.
- Attributes
Create, update and delete attribute definitions for documents, folders, or versions.
- Workflows
Create, update and delete workflows (only available, if the advanced workflow is turn on).
- Workflow States
Create, update and delete workflow states (only available, if the advanced workflow is turn on).
- Workflow Actions
Create, update and delete actions used within workflows (only available, if the advanced workflow is turn on).
- Update fulltext index
Update an existing fulltext index with newly added documents.
- Create fulltext index
Create a new fulltext index. This can also be used to recreate an existing fulltext index from scratch.
- Fulltext index info
Gather various information about the existing fulltext index, like the number of terms, indexed content etc.
- Contents overview
List all folders and documents in a hierarchical structure.
- Charts
Various statistics, e.g. documents per user, new documents per month, etc.
- Folder/Document check
Checks your documents for various errors.
- Timeline
Show previous operations in a time chart.
- Settings
Access various settings for SeedDMS.
- Manage extensions
Manage installed extensions.
- Scheduler
Add frequently running tasks (requires SeedDMS 6)
- Version Information
Displays the current version of SeedDMS.
The figure shows two more buttons ‘List download links’ and ‘Scan for Viruses’ which have been added by extensions.
Users management
Here you manage all the users who should be able to login into SeedDMS. If you are using SeedDMS in conjunction with Active Directory or an LDAP server you should manage the users in the Active Directory and not in SeedDMS.
The page is split into a left column containing a menu to select a user or to create a new one and a right column containing a form to modify an exiting user or to fill in new user data. If a user is selected there will also be some additional information below the select menu.
A user can either be selected by scrolling the menu or entering the first letters of the user name in the input field which becomes visible when the menu is unfold.
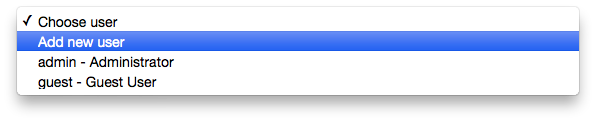
Add a new user
Open the Users management and select Add new user from the dropdown menu.
Add new User
Now fill the appropriate information into the fields.

Add new user
Select the role for your user from the Role dropdown field. You can define administrators, normal users and guests. Those roles are predefined and affect the functions available and the access on documents. Administrators are not restricted in any way. They always have unlimited rights on documents and folders. Guests are very limited in using the system and accessing documents and folders. Guest can search and browse the documents, but they will under no circumstances have more then read access on folders and documents. If access rights are limit further, guest won’t see the documents and folders at all.
If you already have some defined groups you can select the appropriate group by clicking into the Groups field. If you do not yet have any groups you can still do that later in the groups management. Groups are used for defining access rights, notifications and workflow operation.
If you want to define a Home folder for the user, select it by either typing the folder name to search for it or click the Folder… button to select one.
SeedDMS can restrict the maximum space on the disk used by a user by setting the quota field to a value > 0. If there is already a system wide quota this option will not be available. Only document versions will be counted for the quota. Document attachments and comments uploaded as a file when reviewing or approving a document are not taken into account.
If you want to hide the user from the users list, (user not visible for other users but for admins) tick the option. Those users will not show up in any list of users, e.g. in the search form.
If you want to have the account disabled, tick the box. Login for disabled accounts isn’t possible anymore. A user will be automatically disabled if the number of login failures exceeds the configured value in the configuration. Reenabling a user will also reset the number of login failures.
If you want to assign a specific workflow to the new user, select one or more workflows from the dropdown. Whenever the user uploads a new document or adds a new version to an existing document, one of the configured workflows is mandatory. This option is only available if the advanced workflow engine is turned on.
A user can have predefined reviewers and approvers for each document or new version of a document uploaded by this user. This option is only available if the traditional workflow is turn on.
Now click Add new user to create the account.
Edit an existing user
For editing an existing user (e.g. to update the email address) go to the Users management and select the user you want to edit from the dropdown menu.
Change the necessary field, then click Save at the bottom to save your changes.
Disable an user account
If you do not want to delete a user but want to prevent him from accessing your DMS simply go to the Users management, select the user from the dropdown and tick the Disable account checkbox. Click Save once done. The user will be unable to access the DMS and will not receive any notifications anymore until his account suspension is ended.
Accounts may also be disabled automatically, if the number of login failures exceeds the maximum number as configured in the settings. Reenabling the account will also reset the number of login failures.
Delete an existing user
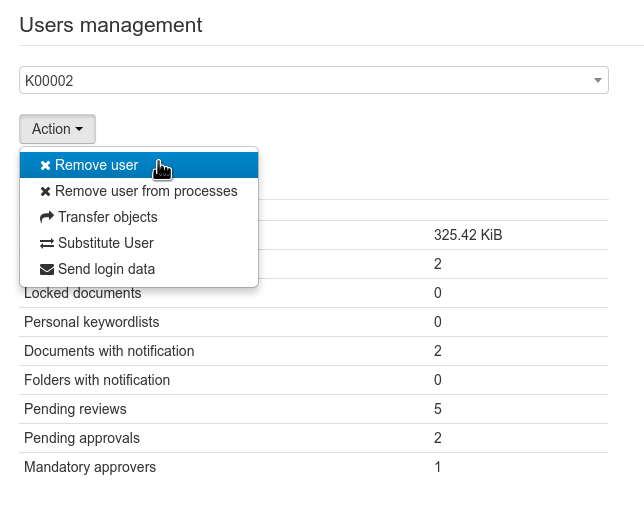
To remove an existing user, go to the Users management, select the user you want to delete and click Remove this user. This will delete the user from all user groups he/she has been a member of. A deleted user cannot be recovered. Before the deletion you will be asked to select a user who will take over the documents and folders of the users.
Delete a user
Deleting a user has various consequences:
all personal keywords and keyword categories will be deleted
all notifications will be deleted
private document links will be deleted and public document links will be transferred to the replacement user
all document attachments will be transferred to the replacement user
all documents locked by the user will be unlocked
all individual access rights will deleted
the users is removed from all workflows (review/approval)
Before the deletion you will be asked which user shall take over the documents of the user to be deleted. If the user is still in any (traditional and advanced) workflow process, then he/she will be deleted from each workflow first, by adding another log message to that process indicating the deletion. This happens for any review/approval regardless of its current state. So even if the user has already approved/reviewed the document it will be marked as ‘user deleted from the process’. You need to check the review/approval log to find out about the user’s previous actions. Be aware that removing a user may have consequences for the review or approval of a document. Documents just having this user as a reviewer or approver will lose it, and therefore will finish its current workflow step. The same is true, if the user is the last approver/reviewer missing to enter the next state. As the review/approval itself will not be deleted, it will still contain the user id which cannot be resolved anymore once the user has been deleted. The listing of reviewers and approvers will therefore contain just a message that the user with id ‘xx’ has been removed. Removing users which are part of an advanced workflow can possibly leave a transition without a user triggering that transition. If that workflow is in use, it may never leave a certain state because the linking transition to the next state is not triggered anymore.
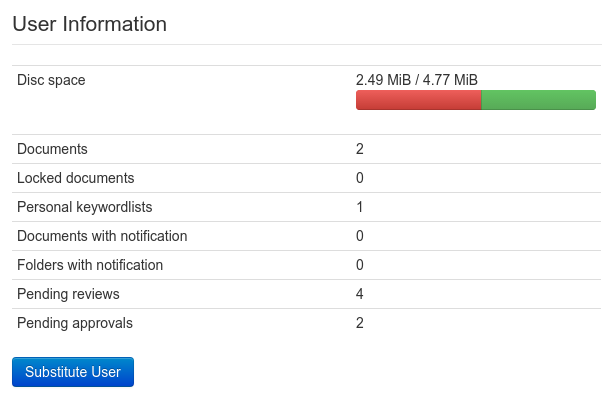
Information about a user
The figure shows information of a user who still needs to review four documents and to approve two documents. If the user is deleted those documents may enter the next state (either being released or waiting for approval). The user also has a personal keyword list. Deleting it is not crucial because keywords are just copied over into a text field of the document. Documents having a keyword from that list will retain it, even if the list is deleted.
Certain users can be protected from deletion in the configuration by specifying their user id. This is useful for an admin account to make sure there is at least one administrator left, even if all other users are deleted.
Deleting a user from all processes
Instead of completely deleting a user, which leaves open references to the user in the review and approval log, a user can only be deleted from the processes he/she is involved in. This includes all reviews and approvals where the user is assigned as an individual, but not as a member of a group, even if the user is the only member of that group. It ensures that there is no document left waiting for the review/approval by the user. Combining this with disabling the account is often sufficient to keep the user from using the DMS, without running the risk of having documents which will never be reviewed or approved. Keep in mind that the user may still be a mandatory reviewer/approver of a user or is part of an advanded workflow. If the user is a mandatory reviewer/approver of another user, and if that user uploads a new document version, the user will be added to a process again even if the user is disabled.
You may discover a difference between the number of documents to review/approve and the number of pending reviews/approvals listed in the user info. This is due to reviews/approvals of previous document versions which are counted in the second case but not in the first case. Deleting a user from all process will also cover previous versions, even though the user will not be able to review/approve them anymore.
Before executing the deletion you can pick from a more fine grained list of reviews/approvals to be actually deleted. Usually, it is sufficient to delete only those reviews/approvals which has not been touched by the user, as they are the only ones which stop a review/approval from finishing. But you also remove the user from processes where he/she has already been active. Keep in mind, that removing a user from a process could result in releasing the document content, if this was the only reviewer/approval or the last reviewer/approval who still had to do the review/approval.
Since SeedDMS 6.0.x revisions and receptions of a document can be deleted and transfered as well. Transfering a revision can lead to unexpected results, if the document content has been obsoleted or has expired. If a revision was previously in state ‘waiting’ it will be transfered into state ‘sleeping’ if the state of the document content was not ‘in Revision’. In general this does not cause any problems, because an obsoleted or expired document does not have to be revised, but if the document status changes back to e.g. release the revision process has to be restarted.
Transfering a process is actually done in two steps. In the first step the old user will be removed and in the second step the new user will be added. This ensures that the transfer is fully visible in the log.
Transfering objects
Disabling an account and possibly removing a user from all processes still leaves documents, folders and attachment belonging to the user. This could complicate further modifications, due to insufficient access rights by other users. A simple way out is to transfer all objects to another user by changing the ownership. This covers all documents, folders, attachments, public document links and calendar entries.
Substitute user
Substitution of a user is a concept for acting as a different user than the user currently logged in. It is inspired by the similar concept on Unix/Linux systems and it is only available to administrators. Once a user substitution has been activated all operations are executed like if that user was logged in. There will be later no way to tell if an operation was done after a user substitution or a regular login. During an active user substitution the main menu will be colored red. User substitution can be initiated either from the user manager or the right most menu item in the main menu. User substitution also works for disabled users which is often the only way to finish remaining tasks of that user without reactivating the account. Leaving the substitution mode is like a regular logout, but the button in the menu is labeled as ‘Sign out user’.
Groups management
If you plan to add several users to your DMS it makes sense to put them into groups. This saves you a lot of work afterwards when defining user actions (e.g. in workflows) or access rights where you can just add the group instead of having to add each single user.
Create a new group
Select Groups management, in there select Add new group from the dropwdown.

Add new group
Define a name for your group and if required, write a description. Click Add new group to create the group. Now you can define the members of the group if you already created the users previously. Otherwise you can add the users later once you created them.
To add a member to your group select the appropriate name from the dropdown. If you want the user to be this group’s manager, tick the Manager checkbox. There is currently no particular function behind a group manager. Click Add once you’re done.
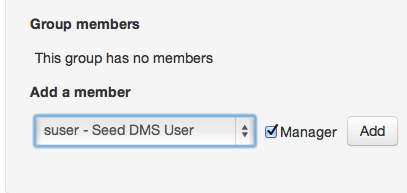
Add group members
Add new members to an existing group
Before you can add a user to a group, first select the group you want to add a member. Now go to Add a member, select the user, decide if you want to make her the group manager (you can have more than one group manager) and click the Add button.
Add a member
Toggle the group manager
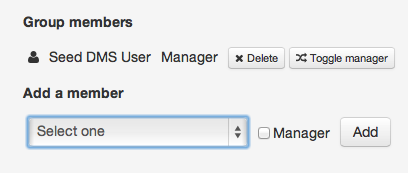
Within Groups management select the group you want to edit. Find the user from where you want to remove the group administrator right and click the Toggle manager button. The change becomes active immediately.
The group manager is able to add or remove users to the group he/she is the manager of. This is only possible, if the Enable Users View is turned on in the settings. In that case the MyAccount page has a subpage Groups which lists all groups and its members in which the currently logged in user is a member of. As a manager there will be buttons to remove and add users.
Remove group members
Within Group management select the group you want to edit. Find the user you want to remove and click the Delete button. This will only remove the user from the group, the user will still be able to log on to your DMS.
Backup tools
The Backup tools provide a variety of possibilities to create a backup of
your DMS data. Those tools are not necessarily required to backup the
DMS. You can as well just backup the database and the content directory
with regular system tools like tar and mysqldump. In case your
are using an sqlite database, it is even enough to backup the content
directory. The tools described here are mostly for those cases where
you cannot operate directly on the filesystem.
It is strongly recommended to use regular backup tools provided by your operating system.
Versioning file creation
This option creates a versioning file inside each document folder in the content store on the hard disk. Select the folder you want to create the versioning file for it and click the Versioning file creation button. Versioning files will be created for each document within the selected folder. Versioning files are a left over from the predecessors of SeedDMS and are kept for compatibility reasons. They contain some meta data stored in the database.

Versioning file creation
Archive creation
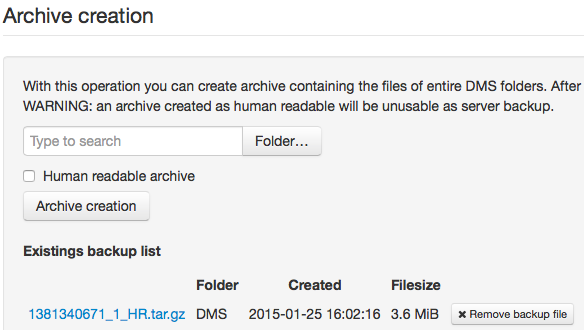
With this option you can create archives containing the files of the entire DMS. You have the possibility to select single folders or backup the whole DMS in one single archive. The archive only contains the files and not the database. All backup files will be placed within the data folder of your DMS.
Two types of backup archives are available:
- Standard archive:
Can be used in combination with a database dump to restore the DMS as it contains exactly the same structure as the data folder of your DMS.
- Human readable archive:
Archive containing only the documents without the corresponding folders. Warning: Human readable archives cannot be used to restore the DMS. Their purpose is rather to export certain parts of the DMS and pass it somebody else who does not have access to the DMS.
Due to a limitation on how the archive is created, file names longer than 100 characters will not be exported propperly.
Archive file creation
To create a backup, either type the folder name into the search and hit the tab key or click the Folder button to select the desired folder from the folder tree. If you want to create a human readable archive tick the checkbox, otherwise leave the box empty. Once done click Archive creation to start.
Depending on the size of your DMS and the power of your server it can take several minutes to complete a backup.
Once the backup is completed it will appear within the Existing backup list. By clicking the name of the backup you can download the file to your computer.
If you want do delete a backup just click the Remove backup file button. Once done you have to confirm the removal of the backup file.
Database dump creation
A DB dump contains the complete database of your DMS. It is recommended that you create a DB dump once you created a standard backup archive. You will only be able to restore a complete previous state of your DMS if you have both available.
To create a DB dump just hit the DB dump creation button.
Create a DB dump
Existing dumps will be shown in the Existing dump files section. To download a file click it’s name, to delete a dump hit the Remove dump button. Once you confirmed the removal of the dump you can’t undo it.
Files deletion
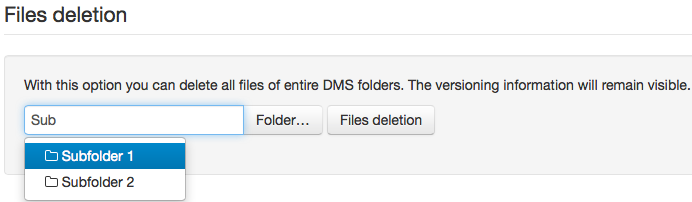
This option should only be used with care as it deletes all files within the folder you choose.
Files deletion
Select the folder for which you want to delete the files either by searching for it by typing it’s name and hit the tab key on your keyboard or click the Folder…* button to select the folder from the folder tree. Once you are ready click the Files Deletion button to proceed.
You will be prompted to confirm the operation.
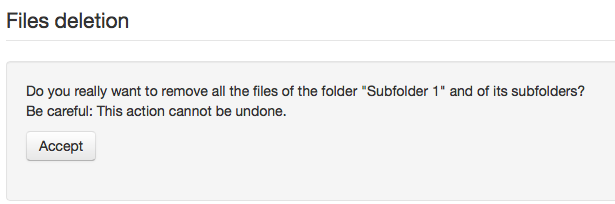
Prompt before file deletion
Click on Accept to delete all the files from the chosen folder. If you do not want to proceed simply click the back button in your browser.
Newer versions of SeedDMS do not have this function anymore, as it causes more harms than it helps.
Log files management
The log file manager is quite simple and straightforward, allowing you to monitor several activities within the DMS and helps to track errors or events.
The logs are rotated hourly, daily, or weekly. For each period one file is being created. Log files will only be created if in the given period any activity has happened.
Logs are created for the web frontend and the webdav part of the DMS. No other log files will be created by SeedDMS.
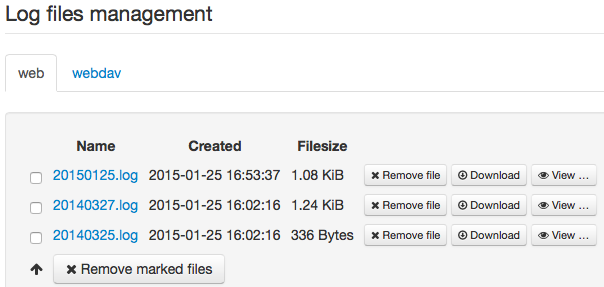
The log manager
To remove a single file, click the Remove file button on the same line, to delete multiple file tick the checkboxes of the files you want to delete, then click Remove marked files at the very bottom of the page.
If you click on Download you will get a file with .log extension.
To view a log you can either simply click it’s name to show it’s content directly in the browser window or you can click the View button to the right to open the file within the integrated viewer.
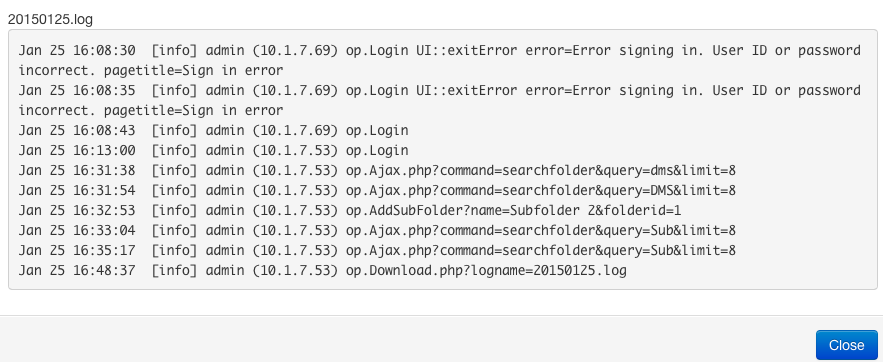
The log viewer
Global keywords
Global keywords allow to specify keyword sets available throughout the whole DMS for every user. Using global keywords help to define standard keywords preventing different ways of writing (e.g. singular/plural) of the same word. The keywords itself are organized in categories which belong to the user, who has created that category. Those keywords in categories created by an administrator will automatically become global keywords, visible by all users. They are still just editable by the user who has created them. That means, that not even admins see keywords of other admins when editing them. Hence, if there is more than one admin, there can be several global keyword lists. If this is not desired it is up to the operator of the DMS to set up internal rules who is in charge for creating the global keyword list.
Keyword categories should not be mixed up with document categories. There are usually just a bunch of document categories while there may be hundreds of keywords. Document categories often form groups of documents with a common property, e.g. Formular, Invoice, Contract. Keywords rather depict the contents of a document to support searching.
Keyword lists are just an aid for entering keywords of documents. Even keywords in none of the keyword lists can be assigned to a document by simply entering it into the keyword field when adding a new document.
Define keywords
After you installed SeedDMS, the keywords section is empty, there are no keyword sets delivered by default.
To add a new category select Add category from the dropdown menu.
Add a new category
Type the desired name for the new category and click the Add category button to continue.
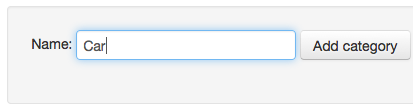
Choose category name
In the next step you can add the keywords to your keyword category. At the time of writing you can only add one keyword at once, if you finished entering click Add keywords to save and continue.
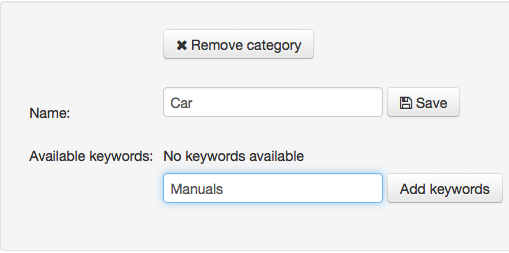
Add keywords
Rename and/or remove keywords
From time to time you may need to update your keywords or delete obsolete ones. From the dropdown menu select the keyword category you want to update.
Update keywords
Now you have the possibility to update or delete the keywords in the chosen category. If you want to update the keywords keep in mind that you can only change one keyword at the same time. Once you updated the keyword click Save to write the value to the database.
To delete a keyword just hit the Delete button beside the keyword. Warning: If you click on Delete the keyword will be deleted immediately. This can’t be undone.

Update keywords
Updating or deleting keywords has no effect on the keywords already used for documents. They remain unchanged.
Delete a keyword category
To delete a keyword category, repeat the steps above, but instead of deleting a single keyword press the Remove category button to get rid of the category. All keywords within this category will be deleted as well. There will be no warning message, once you click on Remove category, the category will be removed immediately.
Categories
Categories help you to keep your documents organized. Unlike keywords, categories are referenced by documents. Any change to the category name will visible in all documents linked to this category. There is just one set of categories which can only be managed by an administrator.
Manage categories
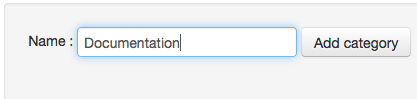
From the dropdown choose Add category, the input field appears to the right. Enter the desired name of your category and click on Add category.
Add category
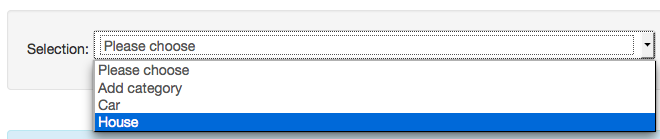
To rename or remove a category, select the category name from the dropdown menu. To rename it, change the name and click the Save button, to remove it click on Remove category to delete it. The change will take effect immediately and can’t be undone.
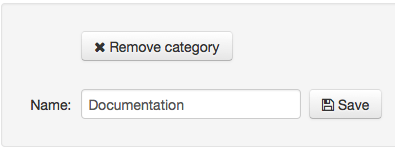
Delete category
A category cannot be deleted if there are still documents linked to this category.
Attributes
Attributes are like tags which can be attached to folders, documents, and document content. The attribute definition determines
to which object the attribute may be added (folder, document, content)
the type of the attribute
whether the attribute has one or more values
the minimum and maximum number of values
a set of allowed values
a regular expression that must match the attribute value
Workflows
Administration of workflows is only available for the advanced workflow engine. The workflow administration sets up the workflows. It requires to first create workflow states and actions which will then be assembled into a workflow. You can find more detailed information about workflows in section `Introduction to Workflows`_.
Workflow states
Workflow states are part of the advanced workflow. It is an intermediate state taken by a document version while running through a workflow. Here you can set up a pool of workflow states which may not necessarily be used by a workflow. Possible states are Waiting for legal approval, Approved by user, Completed, etc.
Workflow actions
Workflow actions represent the action executed by a user on a document version. The action is like a trigger which transfers a document version from one state to the next state. Possible actions could be complete, review, etc.
Fulltext index
If fulltext indexing is enabled in the configuration, there will be an extra menu and extra buttons in the admin tools. Depending on the number of documents in the DMS, it may not be wise to update or create the fulltext index from the admin tools, because a list of documents and folders is created before starting the indexing. Even creating that list may require considerable time.
You can find more detailed information about fulltext indexing in section `Fulltext indexing`_.
Update fulltext index
This will update an already existing fulltext index. Depending on the size of your DMS it can take several minutes to complete.
Create fulltext index
This button can be used to create a new fulltext index (if you never had one before) or to recreate an already existing fulltext.
Fulltext index info
Clicking on this button will display the information gathered from the fulltext index. If the index is out of date, the number of documents or terms may not match the current state of your DMS. Therefore it is recommended to update the fulltext index prior to using the fulltext index info.
The fulltext index info displays the following information: Number of documents and their names, number of terms and the terms themselves, splitted in categories comment, document_id, keywords, mimetype, origfilename, owner and title. Since version 5.1.21 and 6.0.14 two additional fields status and users have been added. Depending on the applied fulltext engine the output can differ.
Contents overview
This tool displays information of all folders and documents in your DMS. A tree view is shown on the left hand side while information about access rights (user and group rights are shown) and statistical data is shown at the right hand side. Depending on the size of your DMS it can take some time to calculate the tree.
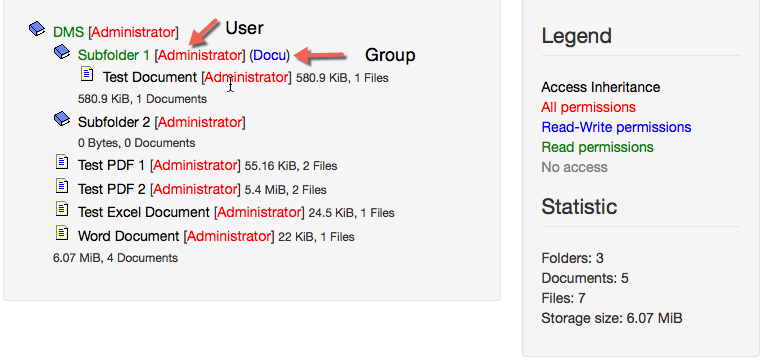
Content overview as tree
Charts
Here you can gather various statistical data, prepared in nice graphs. Currently the following charts are available: Documents per user, Diskspace per user, Documents per mime-type, Documents per category, Documents per status, New documents per month and Number of documents.
Folder/Document check
This utility is to track down damaged documents or other inconsistencies. If errors have been found and an automatic fix is possible, SeedDMS offers to fix the errors for you. The following issues are checked by the Folder/Document check:
Document missing

Document missing
This error occurs if a database entry for a document is present, but no document has been found in the document content directory on disk. This error cannot be fixed automatically. You need to check the file system for the document. If it is there you should check if the permissions are set propperly.
Unlinked content
This is just the opposite of the previous check. It checks if all files in the content directory on disk have a reference in the database.
Missing filesize
This error occurs if the file size entry within the database is missing or wrong.

Filesize missing
Click on Set file size to repair this problem. SeedDMS will search the document in the data folder and write the size into the database.

Filesize repaired
Missing checksum
This error occurs if the documents checksum entry in the database is missing.
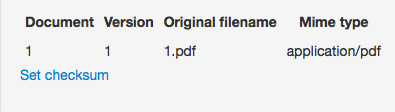
Missing checksum
Click on Set checksum to calculate the documents checksum and populate it into the database.

Checksum repaired
Duplicate Content
Documents listed in this section has content with the same checksum as content belonging to another document. This is not necessarily an error.
Processes without user/group
Users or groups can be assigned as reviewers and approvers. If such a user is being deleted (and not just removed as a reviewer or approver), the review/approval still exists and is listed just like the user/group was removed as a reviewer or approver. The review/approval record still contains the id of the removed user/group which cannot be resolved anymore. SeedDMS keeps this record in order to report any changes to a review/approval process. This check will list all of these records and offers to remove them permanetly. It does not have impact on the review/approval process, because the user/group has been removed from the process already.
Timeline
The timeline creates a graphical representation of all changes to documents. It does it only for a given period of time, but also shows those changes of documents modified within that date range which are further in the past.
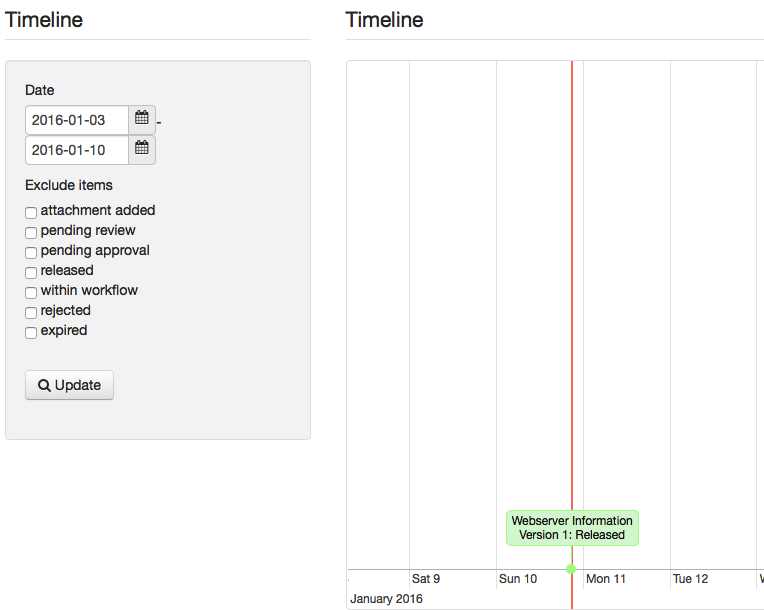
The timeline and its filter options
If many document changes occured in the selected date range, then the diagram can become very crowdy. In such a case just exclude some of the changes by checking one or more of the check boxes below the date range.
Clicking on one of the boxes in the diagram will show additional information about the affected document.
Manage extensions
Extensions have been introduced to SeedDMS in version 5.0.0. There can extend
the features of SeedDMS in various ways. Extensions are located on the disk
in the directory ext. Each extension has its own subdirectory. After a new
extension has been added the list of extensions must be refreshed, otherwise
the extension will be available.

The SeedDMS extension manager with the demo extension installed.
Extension listed with a green background are enabled. Extensions with a yellow background are disabled but could be enabled. Extensions with a red background are disabled because of a dependency problem and therefore cannot be enabled.
Version information
This feature shows you the installed version of SeedDMS. If you have Internet connection (through the browser, not the DMS server), it checks if there is a more current version available and notifies you with a yellow bar as shown in the example below.
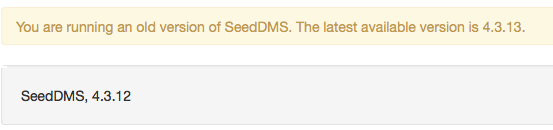
Version information